Thursday, May 28, 2009

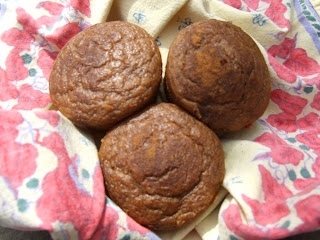
Wheat & Dairy Free Vegan Whoopie Pies


The first time I had a whoopie pie was this winter on a trip to New York. We had been walking around trying to find a place to eat for hours because my boyfriend had declared that we needed a slice of New York style pizza. Trying to find a wheat-, yeast-, and dairy-free pizza place in the Lower East Side in the middle of January turned out to be an almost impossible task and, after pleading a bathroom break, I snuck into a small cafe that happened to serve gluten-free snacks. The cafe was changing over to get ready for the dinner crowd, but I managed to grab the last whoopie pie on the counter to tide me over. 

Since that fateful night, I've seen whoopie pies everywhere (see nytimes article ) and have been wanting to recreate one that I could eat without any problems. There is something so jovial about a cookie that is really a cake but calls itself a pie, pressed around a creamy filling called whoopie. I'm fairly certain these are an American invention, given their similarity to Hostess cupcakes and that most of the recipes call for a jarred filling called fluf, a culinary achievement that I have since found a startling number of uses. 

I've added sprinkles because I think they needed a splash of color and these are really a dessert for those who are closest to you and parties that include children. I'm not sure you would want to serve these to a company of distinguished guests; the charm of the moniker 'whoopie' being lost on some. On the other hand, if you prefer a dessert with a sense of irony or come from an aristocratic heritage and have an Aunt visiting who keeps calling North America 'The New World' and leaving her shoes outside her door to be polished by your 'maid,' these treats might be perfect. 

I am truly proud of the texture of these cakes. They are soft, moist, and fluffy and taste especially good the day they are made. Feel free to make the filling your own: a teaspoon of peppermint oil, some melted chocolate, or smooth peanut butter could be added. I've also seen jars of vegan strawberry fluf, which I've yet to try, but could be fabulous!

Makes about 13 whoopie pies. 

PIE INGREDIENTS:

1 3/4 cups flour substitute
1/2 tsp xantham gum
3/4 cups cocoa powder
1 1/2 tsp baking soda
pinch of salt
2 tbs canola oil
2 tbs prune puree
1/4 cup vegetable shortening
1/2 cup white sugar
1/2 cup brown sugar
1 egg or egg substitute
1 cup soy milk or rice milk
1 tsp white vinegar
1 tbs vanilla

PIE INSTRUCTIONS:

In a small bowl whisk together the flour substitute, cocoa powder, baking soda, xantham gum, and salt. In a stand mixer, beat the shortening, prune puree, and canola oil with the two sugars until fluffy and light. Add the egg or egg substitute (mixed with a tbs. of water) and beat together. In another bowl, combine the milk, vanilla, and vinegar. Sift the flour mixture twice. Working quickly, add the milk mixture alternating with the flour mixture in two batches until combined. Drop large tablespoons of the batter onto a baking sheet lined with a silpat or parchment paper. Without flattening the dough too much, spread the dollops into even circles. Bake the cookies at 350 degrees for about ten minutes, rotating the pans half way through. They should be spongy and spring back when poked. Allow to cool for a few minutes on the pan and then transfer to a wire rack to cool completely. 

WHOOPIE INGREDIENTS:

1 cup vegan rice-mellow fluff
1/2 cup vegetable shortening or vegan margarine
2 tsp vanilla extract
1 1/2 cups icing sugar
4 tbs soy milk or rice milk

WHOOPIE INSTRUCTIONS:

In a mixer, blend the fluff and shortening until smooth. Add the vanilla and then the icing sugar a few tablespoons at a time, adding a tablespoon of milk when it becomes too thick until a spreadable consistency has been achieved. Place two tablespoons of the whoopie on one half of a pie and place another pie on top. Repeat with remaining pies and filling.  

Store in an air tight container for two days or in the fridge for five. 

Tuesday, May 26, 2009

Wheat and Dairy Free Vegan Shortbread


Since my family is Italian, home-made cookies when I was growing up were generally little, hard, crumbly wafers that exist solely for dipping in espresso. I, on the other hand, have made entire dinners out of chocolate chip cookie dough and prefer cookies large, soft, and undercooked. As I bake more the number of exceptions have increased and these little goodies are one of them. While the essential ingredients of shortbread make up a small list, adapting the recipe for wheat and dairy free eaters while keeping the texture of sandy, buttery biscuits was a bit difficult. This recipe is inspired from the back of a box of corn starch and the Fannie Farmer Baking Book. You could easily replace the chocolate with something else; at Christmas, I'll often melt Toblerone bars or Skor bars, or omit this step entirely. One other note: Some dairy free bakers use butter flavoring in their baking. This is also very common in professional baking. If you find the taste of these not as buttery as you would like, you might try it. 

Makes aprox. 24 cookies

SHORTBREAD INGREDIENTS:

1/2 cup corn starch
1/2 cup + 2 tbs icing sugar
1/4 cup rice flour
3/4 cup wheat free all purpose flour
1/8 tsp xanthan gum
pinch of salt
3/4 cup shortening
2 tbs warm water
2 tbs. sugar
1/2 cup chocolate chips

SHORTBREAD DIRECTIONS:

In a medium bowl, stir together the corn starch, icing sugar, rice flour, wheat free flour, xanthan gum, and salt. When these ingredients are combined, add the shortening and warm water. Roll the dough on a floured board with a floured rolling pin to 1/4 inch. Cut into shapes and place on an oiled sheet. Sprinkle the tops with granulated sugar. Bake at 325 degrees for fifteen minutes. Its important to cut the shapes cleanly because the crumbs will make your cookies look ragged. 

For the chocolate sides, melt the chips in a double boiled and dip half of the cooled cookies so that the top and sides are covered. Let cool on a silpat so they are easy to remove. 

Thursday, May 21, 2009

Wheat and Dairy Free Vegan Candy Bars


There is something about all the nice weather we have been having that has put me in the mood for picnics and treats that are cut up into portable, sturdy squares. The brownies I made a few days ago are, for me, the ideal and defiantly uni-flavored treat. Some days, however, require a bit more dimension of texture and taste.

This recipe is the result of compiling several recipes together along with my nostalgic, no doubt inaccurate, recollections of bake sale Rice Krispies squares. A key part of this square is the texture: What I remember of Rice Krispies squares were the gooey-ness that came from the marshmallows. A quick caramel syrup mixed with the puffed rice cereal will create a base layer that, when cut, will be the consistency of dust. To keep the bars nice and chewy but still strong enough to support the peanut butter and chocolate layers, I've created a soft caramel to use here. If you would like to up the peanut butter factor and the softness, you can also add in a few tablespoons or so with the corn syrup. If it's more chocolate you're after, melt a few ounces and stir that into the peanut butter middle layer. 

And, just to keep things from becoming monotonous, I've cut these layered goodies into triangles. 

Makes aprox. 12 bars. 

BAR INGREDIENTS:

Base:
2 cups of wheat free puffed rice cereal
1/2 cup sugar
1/2 cup water
2 tsps corn syrup
2 tbs vegan margarine
2 tbs milk alternative

Peanut Butter Middle:
1 cup smooth peanut butter
3 tbs margarine
3/4 cup icing sugar
1 tsp vanilla 
aprox. 2 tbs milk substitute
sprinkle of salt (optional)

Chocolate Topping:
3/4 cup chocolate chips
1 tsp corn syrup
aprox. 4 tbs milk substitute 

BAR INSTRUCTIONS:

Line a 9 x 9 pan with tin foil and lightly oil. In a heavy sauce pan, combine the sugar and water. Bring to a boil while stirring. Using a candy thermometer, boil the syrup until it reaches the soft ball stage. If you don't have a candy thermometer, after five minutes drop a dollop of the syrup into a glass of luke warm water. The syrup should become malleable and soft. This recipe isn't too fussy though, just try to avoid burning the caramel. When it is ready, remove from the heat and add the corn syrup, milk substitute, and the margarine. It will boil furiously and then become a lovely caramel. Add the puffed rice and stir to coat. Press the caramel rice into your pan and using your finger press the cereal into an even layer. 

While this is cooling, mix together the peanut butter and margarine until smooth. Add the vanilla and icing sugar and then the milk as you need it to make the mixture spreadable. Cover the rice layer with this mixture and then pop it into the freezer until firm, or about fifteen minutes. 

Melt the chocolate chips and add the corn syrup. Stir until it becomes a paste. Add the milk substitute one tablespoon at a time to create a glossy icing. You may need more or less milk substitute. Take the first two layers out of the freezer and spread the chocolate mixture on top. The cold will make the chocolate firm up quickly. 

Cut into squares (or triangles) using a serrated knife. To keep the caramel soft, wrap the tin tightly. The squares will keep for five days or so. 

Tuesday, May 19, 2009

Wheat and Dairy Free Vegan Brownies


These are a classic brownie. Fudgy and moist, they are super rich but sturdy enough to support the frosting that coats the top. I think every baker has a fall-back brownie recipe in her repertoire and these are mine. Like many baked goods, the secret is underbaking them. Since there are no eggs, there is nothing to worry about here. When you pull them out of the oven, they will be a bit puffy, but wait a few minutes and they will suffer a vertigo that would make a souffle maker shudder. If they don't fall they will be good too, but cakey. If it's a dense brownie you're after and they haven't flattened after a few minutes on the counter, then drop the pan of still warm brownies onto a mat on the floor. A college roommate and one time Starbucks employee supplied me with that tip. 

I've included a fudge frosting at the bottom that unlike many vegan and wheat-free baking recipes, which I must say really takes the maxim "baking is a science" to heart, allows for a little more flexibility. 

Makes aprox. 24 brownies

BROWNIE INGREDIENTS:

1 cup wheat-free flour blend
1/4 tsp xantham gum
1 tb. cornstarch
1 3/4 tsp baking powder
1 cup brown sugar
1/2 tsp baking powder
1/4 tsp baking soda
5 oz dark chocolate (5 squares) 
1/2  cup plus 2 tbs pureed prunes
3/4 cup canola oil
1 tbs vanilla
1/2 cup hot water (or coffee or water mixed with a shot of espresso)
chocolate chips tossed in cocoa powder

BROWNIE DIRECTIONS:

In a medium bowl, stir, do not whisk, together the flour, cornstarch, xantham gum, baking powder, and soda. Over a double boiler, melt the chocolate and remove from the heat. Add the canola oil and vanilla stirring gently so as not to incorporate any air. Add the prune puree to the flour and then the chocolate mixture. Without over mixing the batter add the hot water until everything is combined. Carefully fold in the chocolate chips and anything else (nuts, caramel bits, left over Easter eggs etc.) that strike your fancy. Pour into a 9 x 13 pan lined in foil and bake at 350 degrees for eight minutes. Rotate pan and bake for 5 more. A cake tester should come out clean. If you need more time, wrap the excess foil over the top so as to prevent the brownie from becoming too dark. Whisk them out of the oven the moment they are done and let them rest, at which point they should fall. The foil will help you take them out of the pan and transport them. Frost if desired and I always do! 

FUDGE FROSTING INGREDIENTS:

1 cup semi-sweet chocolate chips
2 tbs vegan margarine
1 tsp corn syrup
1 tsp Bird's Custard Powder
vanilla 
milk substitute

FUDGE FROSTING DIRECTIONS:

In a double boiler, melt the chocolate and margarine until completely smooth and blended. Remove from the heat and add corn syrup and 1/2 tsp. of the Custard Powder and then put the whole pan into the freezer. After about ten minutes, the chocolate should be quite stiff. Stir, so that the stiffer outside blends with the runnier middle. Add a few tablespoons of milk and the remaining custard powder and stir. Add more milk if necessary. The icing should be creamy and very chocolatey. Spread on the cooled brownies. Like fudge frosting made of butter, this will become stiffer as it cools. The more milk you add, the longer you will have to play with it before it becomes rigid. 


Friday, May 15, 2009

Wheat and Dairy Free Vegan Gingerbread Muffins


This recipe may seem a tad unseasonable, but for those of us opening up summer cottages in the next month or so, this recipe is surprisingly apt. Our cottage is not winterized and we usually finish the summer season at Canadian Thanksgiving the year before. The food that we leave up there is generally appropriate for this ad-hoc holiday which is celebrated quite early up here. Mostly what we have includes pureed pumpkin, maple syrup, and other pumpkin pie ingredients that got left behind. These little muffins are perfect to make on the first morning up North. It is still cold enough that you want something filling, but simple and fast enough to make at the cottage. The recipe is also very forgiving, which is important because I often find that the baking soda and powder is well past its date and the spices in our spice drawer are purchased  from companies I cannot even find anymore. 

Makes 20 Muffins.

MUFFIN INGREDIENTS:

1 3/4 cups flour alternative (I've used everything from ground up oats to garbanzo bean, but I have to say Bob's Red Mill All Purpose is the best)
2 tsp baking powder
1 tsp baking soda
1 tsp xantham gum (optional)
pinch salt
2/3 cup brown sugar
2 tbs ground ginger
2 tsps cinnamon
1 tsp nutmeg
1/2 cup canola oil
1/2 cup molasses
2/3 cup soy milk
1 1/4 cup pumpkin puree (plain and unsweetened, about one can)
3/4 cup room temperature water

MUFFIN DIRECTIONS:

In a bowl, whisk the flour, spices, baking powder, soda, brown sugar, salt, and xantham gum (if using). In a large cup with a spout, stir together the milk, oil, and molasses. In another bowl, combine the pumpkin and water. Add the dry ingredients alternating with the pumpkin and water until combined. Spoon the batter into greased muffin tins and sprinkle with additional cinnamon if desired. Bake at 350 degrees for twenty minutes or until a cake tester comes out clean. These little darlings are moist and not too sweet. If you are ambitious, a maple icing tastes amazing, but I enjoy them quietly with another left-for-the-winter staple: jam.

Wednesday, May 13, 2009

Caramel Popcorn Peanut Butter Wheat and Dairy Free Cookies


I often find that I have to drag people to eat my baked goods. Tell someone that the cookie they were about to innocently enjoy has no wheat, dairy, or often any eggs and they look at me like I've suggested they snack on their own teeth. This recipe also takes some convincing, even for people used to eating foods made from alternative ingredients. The combination of popcorn, caramel, peanuts, and chocolate is generally enjoyed, but their combination as a cookie is something a bit different. I promise you, these are worth it. They are soft and buttery and none of the caramel sticks to your teeth like regular popcorn. 

One note about popcorn: I happen to have one of those archaic popping machines taking up my very limited counter space. It doesn't work well; I bought it second hand at a garage sale; and it is a nuisance to clean, but I've never gotten rid of it and continue to use it somewhat defiantly.It often burns my corn as well, but you must studiously avoid this for these cookies! Remove any burnt bits before covering them with caramel. If you are not prone to keeping absurd kitchen tools that have only one purpose around, a bag of natural microwave popping corn or the classic stove pop version will work as well. If you would just like to eat some caramel popcorn (maybe with peanuts and chocolate thrown in), this caramel recipe will cover around three or four cups of popped corn and is totally vegan.

Makes aprox. 18 cookies.

CARAMEL POPCORN INGREDIENTS:

1 cup of popped popcorn with a tiny dab of margarine melted on and a generous smattering of table salt
1/2 cup margarine
1/2 cup corn syrup
1 cup brown sugar
1/2 tsp. baking soda

POPCORN DIRECTIONS:

Have the popcorn ready in a bowl by your stove. Melt the margarine and add the corn syrup and brown sugar in a large sauce pan, stirring until it has dissolved. When the mixture has begun to boil stop stirring and let boil over low medium heat until a candy thermometer reads 200 degrees.

If you don't have a thermometer, don't worry. You can just watch the pot carefully and take it off the heat after about five minutes. Do not let the caramel become dark. After removing from the heat, add in the baking soda and stir until combined. 

Working quickly, poor the popcorn into the caramel and stir to coat. Then, poor the mixture and all the extra caramel onto a silpat or piece of tinfoil to cool. Put the pan under hot running water right away to help with the clean up. The popcorn should be very caramel-ly. When it is cool, roughly chop up the popcorn and extra caramel bits into manageable, chocolate chip sized pieces. This is also a good time to remove any kernels that didn't pop so as not to break anyone's teeth. 

COOKIE INGREDIENTS:

1 cup natural, unsweetened peanut butter
1/2 cup brown sugar or agave nectar
1 egg or egg substitute
1 tbs. of canola oil, or your favorite butter substitute
dash of vanilla
1/2 tsp. baking soda. 
1/2 cup aprox. semi-sweet chocolate chips or chunks
fleur de sel

COOKIE DIRECTIONS:

Either by hand or with a mixer, blend the peanut butter, canola oil, and sugar. Then add the egg, vanilla, and baking soda. Fold in the chopped caramel popcorn and chocolate. The dough will look very crumbly. To form the cookies, grab a small handful of dough and mold it into a ball, flattening it between your palms. Bake at 350 degrees for about ten to twelve minutes. The cookies will have risen a bit and be golden at the edges. Cool on the pan for five minutes and then move to a cooling rack. Before they are completely cool, sprinkle a pinch of fleur de sel on each cookie. 


Monday, May 11, 2009

Wheat and Dairy Free Strawberry Cake


I first made this cake as one of three layers for a Napoleon themed cake, but I think it it quite good on its own. The strawberries make the cake the loveliest color of pink and with the white vanilla icing the whole effect is really quite charming. This cake takes quite well to other types of berries: if you are lucky enough to live in a place where you can get something fresh, I strongly encourage you to try them! I've used all margarine here because prunes ended up darkening the cake and I love the pure, baby-cheeked simplicity of soft pink and white. 

For the all-purpose flour, I've used a medley from Bob's Red Mill. The company recommends adding xanthan gum. However, during a cooking session with Mark Bitten and Jamie Oliver I watched once, the chefs advised against eating anything with a name you cannot pronounce and I've internalized that tidbit into a bit of a mantra. That being said, many chefs swear by it and if you prefer not to snatch at bits of media sensationalism and take them as the gospel, you are probably better off for it. 

The cake I am making here is for two: so I've used one square pan and cut the baked cake into two rectangles. If you would like a proper layer cake double the recipe. This recipe is an adaption from Sprinkles Bakery, which makes cupcakes, and I've tried this recipe as cupcakes as well. You will get about eight large ones or a dozen medium sized ones from this recipe. 

CAKE INGREDIENTS:

1/3 cup (generous) of pureed strawberries, fresh or from frozen
1 tsp. vanilla
1 1/4 cup wheat free pastry flour (or regular if you don't have it)
2 egg whites
1 large egg
1 tsp. baking soda
1 tsp. custard powder (optional)
large pinch salt
1/4 cup soy milk (I use vanilla if I have it)
1/2 cup margarine
3/4 cup sugar
drop or two of red food coloring (optional)

CAKE DIRECTIONS:

In one bowl mix the strawberries, vanilla, soy milk, and red food coloring if using. In another bowl sift or whisk together the flour, baking powder, custard powder (if using), and salt. Then, beat the egg whites to soft peaks that barely hold their shape. I usually just use a whisk, it only takes a few minutes. 

In your mixer, beat the margarine and sugar together and add the whole egg and mix until combined. Beginning with the flour, alternate between the strawberry-soy mixture and the flour mixture. When these have been just blended into the margarine, sugar, and egg, fold the egg whites in gently. Pour the batter into a well greased tin and bake at 350 degrees for 20 to 30 minutes. The cake will become enticingly spongy on the top and a cake tester should come out dry. 

ICING INGREDIENTS:

5 large strawberries, pureed.
2 cups icing sugar
2 tbs. margarine
1 tb. soy milk

ICING DIRECTIONS:

Since there are many options for the size of this cake, I've provided enough to generously ice the cake shown. But I consider these measurements a ratio in the Michael Ruhlman sense, so feel free to double, half, or whatever you need to suit your needs. I've left the seeds in because they provide a crunchy burst of strawberry flavor, but if you take them out with a sieve, you will have something quite professional looking. I also made the same icing without the strawberries to use for piping.

Blend the margarine, strawberries, soy milk until smooth. Then spoon in the icing sugar until the icing is spreadable. 


p.s. the couple who I baked this cake for were sweet enough to send in a picture of it cut to post here. Thanks guys!


Wednesday, May 6, 2009

Wheat Free & Dairy Free Oreos


Though I no longer live in America, I fondly recall the iconic Oreos. The best part, was that they always seemed to be coming out with new ways to fill those iconic little wafers. Neon Swirl, Double Stuffed, Igloo, Reversed, Batman, and of course Mini Oreos. I abandoned the Oreo when my family moved to Canada and inexplicably took up an unfortunate relationship with Viva Puff Cookies that my parent's shamelessly indulged. 

While I certainly won't call my tastes refined, I can no longer stomach Viva Puffs and have taken up with the Oreo once again. I don't think I ever would have tried to make these from scratch had I not become allergic to wheat and dairy. There is something quite annoying about making a batch of cookies and then ending up with only half, because you really need two cookies to make each sandwich. To be honest, if I bake these for myself, I usually just make a little more filling and ice each one instead of making a proper Oreo. I've made the ones shown here for an event, so I stuck to form, but in the spirit of innovation at the Mr. Christie factories, replaced the dairy and wheat. 

INGREDIENTS:

makes aprox. 24 sandwiches.

For the Cookie:
1 1/2 cup cocoa powder
1 tsp. baking soda
pinch of salt
2 1/2 cup of non wheat flour (I used a wheat free all purpose baking flour that was a mix of fava bean, rice, and tapioca, but I've made these with all rice flour and had no problem!)
6 tbs. margarine
4 tbs. vegetable oil or coconut oil
1 cup brown sugar
2 eggs

For the Filling:
3/4 cup margarine
1/2 cup vegetable shortening
2 tsps. vanilla
3 cups icing sugar

DIRECTIONS:

In a separate bowl whisk together the flour, cocoa, salt, and baking soda. Using a mixer, blend the margarine, oil, and sugar. When combined add in the eggs and vanilla. Slowly add the flour mixture. The dough will be stiff. Roll the dough out to 1/4 inch onto cutting boards using some parchment paper to prevent sticking. Let the dough chill for a bit while you tidy up (about 20 minutes) and then cut them out into small circles and bake at 350 degrees for about 12 minutes, a few minutes longer if you want them to be crunchier. Cool on a rack. 

For the filling, beat the margarine and shortening together with the vanilla and then add the icing sugar until it is spreadable and sweet to your liking. 

Then spread a tablespoon of filling onto a wafer and press another cookie on top. I like my filling to spread to the edge, a point of frustration with the originals, but purists will use less icing and no doubt have cleaner, nicer looking cookies for it. These will last out for a few days, but pop them in the fridge to keep up to a week. 

Sunday, May 3, 2009

Mini Pancakes


The first weekend we can eat brunch outside is absolutely a reason to make something more exciting than eggs or granola. Though heating up the kitchen to make pancakes is not an ideal summer activity, I think warm pancakes on the first day you can sit outside with nothing more than a cardigan is the perfect small celebration. 

Pancakes without butter used to seem a little sacrilegious to me and indeed I do miss it. I have found that frying the pancakes in a slightly upsetting amount of oil renders these little cakes quite crisp and distracts me and most guests from the absence of animal fat. 

The inclusion of Bird's Custard Powder in with the dry ingredients is one I make quite often in baking. It offsets the rice-y-ness of the flour and adds a touch of sweetness. Don't be alarmed that it turns your pancakes slightly yellow, the flavor it adds is absolutely worth it and yellow is a beautiful color to offset blueberries or raspberries against, which I will do when they are finally in season here. 

INGREDIENTS: 

1 cup rice flour (or whatever you prefer)
1 tb. Bird's Custard Powder
pinch salt
2 tsps. baking powder
1 tb. white sugar
1 egg (if you don't want to use the egg, add more baking powder)
3 tbs. canola oil
1 cup water or soy milk

DIRECTIONS:

Combine the flour, custard powder, salt, sugar, and baking powder in a bowl.  Add the egg and then the oil and water. Adjust the amount of liquid and flour to taste. It should be quite runny. On an oiled, heated skillet ladle out whatever size you wish. I prefer mini ones to maximize the amount of maple syrup I can use, but those who do not view pancakes as a vehicle for their toppings might try a larger size. Like a regular pancake these will bubble up when they are ready to be flipped and take little more than a few minutes. I often find the first one to be a bit of a disaster, but its broken, half-cooked bits are the perfect snack while I prepare the rest.